Zabbix proxy is one of the infrastructure components that allows you to collect monitoring data from multiple devices and send data to the Zabbix Server. Zabbix Proxy can be used to collect monitoring data from remote locations, from hosts behind a firewall, or to reduce the load on the central Zabbix Server in large environments.
In this article, we will show how to install and configure Zabbix Proxy on Linux (Rocky Linux/Oracle/RHEL 8).
Install the Zabbix repository:
$ sudo rpm -Uvh https://repo.zabbix.com/zabbix/5.4/rhel/8/x86_64/zabbix-release-5.4-1.el8.noarch.rpm
$ sudo dnf clean all
Install packages:
$ sudo dnf install -y zabbix-proxy-sqlite3 zabbix-agent policycoreutils-python-utils nanoCreate a directory for the SQLite database:
$ sudo mkdir /var/lib/zabbix/
$ sudo chown -R zabbix. /var/lib/zabbix/
Edit the config file:
$sudo nano /etc/zabbix/zabbix_proxy.confServer=10.1.15.10 # Zabbix server address
Hostname=sp-zbprx1 # Zabbix Proxy hostname
LogFile=/var/log/zabbix/zabbix_proxy.log
LogFileSize=1024
PidFile=/var/run/zabbix/zabbix_proxy.pid
SocketDir=/var/run/zabbix
DBName=/var/lib/zabbix/zabbix_proxy
DBUser=zabbix
SNMPTrapperFile=/var/log/snmptrap/snmptrap.log
Timeout=4
LogSlowQueries=3000
StatsAllowedIP=127.0.0.1
Run zabbix-proxy (required as this will create SELinux rules):
$ sudo systemctl start zabbix-proxyIf SELinux is enabled on the host, you need to add allowing rules:
$ cd /tmp
$ sudo grep zabbix_proxy /var/log/audit/audit.log | grep denied | audit2allow -m zabbix_proxy > zabbix_proxy.te
$ sudo grep zabbix_proxy /var/log/audit/audit.log | grep denied | audit2allow -M zabbix_proxy
$ sudo semodule -i zabbix_proxy.pp
Enable the zabbix-proxy service:
$ sudo systemctl start zabbix-proxy
$ sudo systemctl enable zabbix-proxy
$ sudo systemctl status zabbix-proxy
You can view Zabbix proxy logs as follows:
$ sudo tail -f /var/log/zabbix/zabbix_proxy.logTo secure connections between the proxy and the Zabbix server with encryption, we will additionally configure a pre-shared key (PSK).
Generate PSK key:
$ openssl rand -hex 32 | sudo tee /var/lib/zabbix/proxy.psk
$ sudo chown zabbix. /var/lib/zabbix/proxy.psk
Add PSK information to zabbix proxy config file:
$ sudo nano /etc/zabbix/zabbix_proxy.conf####### TLS-RELATED PARAMETERS #######
TLSConnect=psk
TLSPSKIdentity=sp-zbprx1
TLSPSKFile=/var/lib/zabbix/proxy.psk
Restart the service:
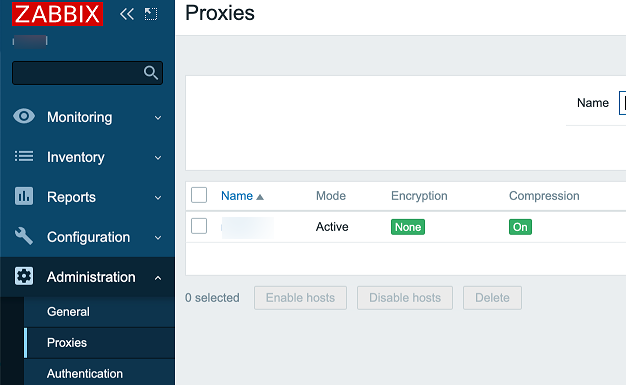
$ sudo systemctl restart zabbix-proxyRegister your proxy in the Zabbix Server web interface and specify your PSK key.