
The maximum and optimal size of the mailbox database in Exchange Server 2019/2016/2013 varies depending on the edition:
Exchange Server Standard:
- Up to 5 databases mounted at the same time on a single server
- Maximum mailbox database size – 1 TB (1024 GB)
- Recommended size – no more than 200 GB per standalone mailbox database
Exchange Server Enterprise:
- Up to 100 databases on a single mailbox server
- Maximum database size – 16 TB (16384 GB)
- Recommended size – no more than 2000 GB per database when using a DAG
Get Mailbox Database Size and White Space on Exchange Server
To view the current file size of the mailbox databases on the Exchange Server and the available space (white space), run the following PowerShell command:
Get-MailboxDatabase -Server EXCH01 -Status | ft name,databasesize, availablenewmailboxspace –auto
The command displays the current statistics for the databases mounted on the EXCH01 host.
Please note that the disk space allocated for whitespace is not automatically reclaimed. It is used to store new mailboxes and email items. This means that Exchange databases are always growing. You can perform offline defragmentation or recreate the database to reduce the file size and free up space allocated for whitespace.
How to Reduce the Exchange Database (EDB) File Size?
To reduce the size of the Exchange database file (*.edb), you must defragment it. This is done offline (you must unmount the database) and can take several hours depending on the database size.
Dismount –Database MBX1
Eseutil /d E:\MBX1\MBX1.edb /t T:\MBX1\TempDB.edb
Mailbox database defragmentation is rarely used in a production environment. It is much easier to rebuild the database from scratch to remove the whitespaces and reduce the mailbox database size.
- Create a new Exchange mailbox database;
- Move all of the mailboxes from the old database to the new one:
Get-Mailbox -Database MDB1 -ResultSize Unlimited | New-MoveRequest -TargetDatabase MDB2 - Once the mailbox move request is complete, you will need to delete the source mailbox database.
Increasing the Database Size Limit in Exchange Server Standard
We mentioned above that in Exchange Server Standard you can only mount 5 mail databases with a maximum database file size of 1024 GB. If the size of your Exchange mailbox database exceeds 1TB, it will be automatically unmounted, and mailboxes in that database will become inaccessible to users.
In this case, the following event with EventID 40011 will appear in the Event Viewer:
Log Name:      Application

Source:        MSExchangeIS

Event ID:      40011

Task Category: MAPI

Description: Exchange store MBX1: The logical size of this database (the logical size equals the physical size of the .edb file minus the logical free space) is 10302 GB. This database size has exceeded the size limit of 1024 GB, configured in registry key Database Size Limit in Gb at SYSTEM->CurrentControlSet->Services->MSExchangeIS->EXC2->Private-database GUID.
Because the maximum database size in Exchange Standard is strictly limited to 1024 GB (1 TB), the database is automatically unmounted if it exceeds this limit.
To increase this limit, you must purchase an Enterprise license or increase the maximum size of the mailbox database through the registry:
- To do this, you need to get the mailbox database GUID:
Get-MailboxDatabase -Identity MBX1| Ft Name, GUID
- Then open the Registry Editor (
regedit.exe) and go to the registry keyHKEY_LOCAL_MACHINE\SYSTEM\CurrentControlSet\Services\MSExchangeIS\<YourServerName>\Private-<your-db-GUID>; - Specify the maximum database size that you want to set in the
Database Size Limit in GBregistry parameter. If this parameter is missing, create it manually (DWORD type);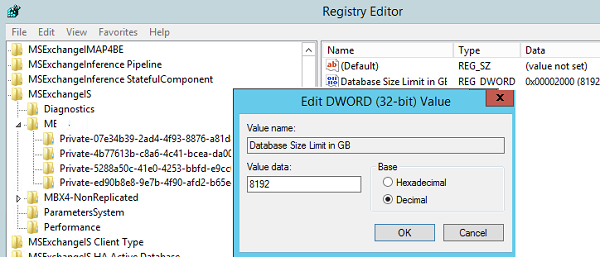
- Restart the Microsoft Exchange Information Store service (
MSExchangeIS) using PowerShell or services.msc:get-service MSExchangeIS| restart-service - Mount the database with the
–Forceoption:Mount-Database -Identity MBX1 -force
- If your database is running in a DAG, you need to apply this registry setting on all servers with a copy of the database;
- When using DAG, automatic switching doesn’t work. To activate a database copy on another mailbox host, you must switch it manually and mount it with the -Force key;
- The changes you have made to the registry will be removed after the next Cumulative Update (CU) is installed on the Exchange Server host. To workaround this restriction, you can apply this registry change through Group Policy Preferences.
This article is applicable to Exchange Server Standard 2019, 2016, 2013, and 2010.