
In this article, we’ll look at how to automatically connect to an OpenVPN server when a user logs into Windows using a startup shortcut or using a Windows Service.
Autostart OpenVPN Client at Windows Startup
Copy your *.ovpn profile file with your VPN settings to C:\Users\YourUsernName\OpenVPN\config or to C:\Program Files\OpenVPN\config folder.
Now you need to open the Windows startup folder. To do this, press Win+R and run the shell:startup command. This will open the current user’s startup folder (%APPDATA%\Microsoft\Windows\Start Menu\Programs\Startup). Windows automatically runs all programs in this folder when the user logs on.
If you are using the openvpn-gui.exe client (OpenVPN 2.5), then the following command is used to automatically connect using the specified profile in the *.ovpn file:
"C:\Program Files\OpenVPN\bin\openvpn-gui.exe" --connect your_vpn_connection.ovpnJust copy the OpenVPN GUI shortcut to the Startup directory and add the --connect your_vpn_connection.ovpn parameter in the shortcut settings. Or create a new shortcut, specify the full path to the openvpn-gui.exe file, and add the --connect *.ovpn parameter.

If you want to hide the OpenVPN status window when connecting to the server, add the --silent_connection 1 option to the startup command.
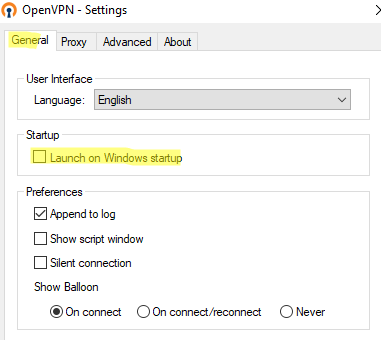
Now run the OpenVPN client and disable automatic launch at Windows startup (General tab -> Launch on Windows startup). This will prevent a conflict with the auto-connect command we created earlier.
Now Windows will automatically establish a connection with the OpenVPN server when the user signs in.
If you are using the OpenVPNConnect.exe (3.3.x) client from OpenVPN instead of the community client, be aware that it doesn’t yet have command line options to connect to a VPN server using a configured profile file.
In the OpenVPN Connect client settings, you can enable the Connect latest option (under Launch options). In this case, the OpenVPN client will automatically connect using the last used ovpn profile.
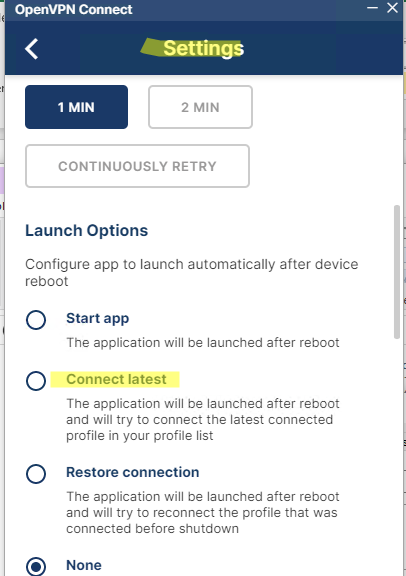
Also, you can enable this option from the command prompt:
C:\Program Files\OpenVPN Connect\OpenVPNConnect.exe --set-setting launch-options:connect-latest
In this example, we have shown how to configure an automatic OpenVPN connection for a single Windows user. If you need to enable an automatic OpenVPN connection for all users, you can create a task in the Task Scheduler or enable the OpenVPN service.
Run the OpenVPN Client as a Windows Service to Connect Automatically
You can set up an automatic connection using the OpenVPN service, which will automatically establish the VPN connection before the user logs in to Windows. Using the OpenVPN Connect 3.2+ client, you can run the OpenVPN service that automatically connects to the OpenVPN server when Windows starts.
- Open a command prompt as an administrator and go to the directory:
cd "c:\Program Files\OpenVPN Connect" - Install the OVPNConnectorService:
ovpnconnector.exe install - Specify the full path to the OVPN configuration file to be used for the connection:
ovpnconnector.exe set-config profile "C:\OpenVPN\client.ovpn"
- Specify the file name where to write OpenVPN client connection logs:
ovpnconnector.exe set-config log "C:\OpenVPN\client.log"OpenVPN logs are also available in the Event Viewer under Windows Logs -> Applications. Enable the filter by the Event Source OVPNConnectorService. - Start the OpenVPN service:
ovpnconnector.exe startCheck that the client successfully connects to the OpenVPN server. The following message should appear in the log:
Wed Feb  1 11:13:29 2023 Connected via TUN_WIN

Wed Feb  1 11:13:29 2023 EVENT: CONNECTED YourOpenVPNProfile via /UDPv4 on TUN_WIN/10.1.2.10/ gw=[10.1.2.8/]
And your WinTUN virtual adapter got an IP address from the OpenVPN server. - Now configure automatic startup for the OVPNConnectorService using the
services.mscconsole or with the command:sc config OVPNConnectorService start=auto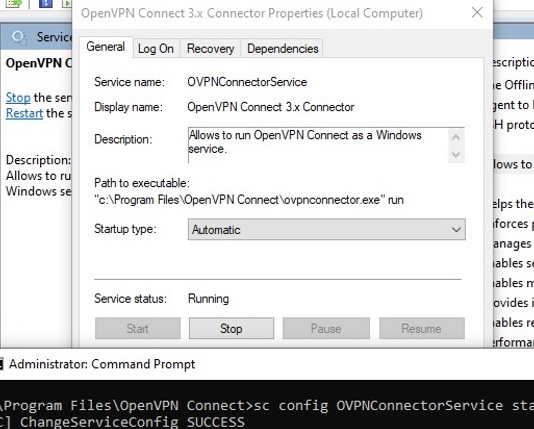
- The OpenVPN service will now automatically connect to the server after Windows is restarted.
If you want to disable and remove the OVPNConnectorService service, run the following commands:
ovpnconnector.exe stop
ovpnconnector.exe removeIf you are using OpenVPN authentication via Active Directory, you can save the username and password to a plain text file and use it to automatically connect.
Create a text file login.txt in the C:\Program Files\OpenVPN\config directory.

And add the following options to the ovpn configuration file:
auth-user-pass login.txt

auth-retry nointeract

auth-nocache
If you are using the OpenVPN GUI client, you can also configure the system service to connect automatically.
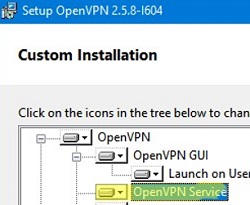
- Be sure to select the OpenVPN Service when installing the OpenVPN client;
- Copy your OpenVPN profiles (.ovpn files) to the directory “
C:\Program Files\OpenVPN\config\“ - The OpenVPN service will automatically start a VPN tunnel for each *.ovpn configuration file from this directory.If you want more than one OpenVPN connection to be active on your computer at the same time, make sure that a sufficient number of TUN/TAP virtual network adapters have been created in Windows. Otherwise, the error All TAP-Windows adapters on this system are currently in use will appear in the logs. It is also recommended to bind an OpenVPN connection to a specific network interface using the following option in .ovpn:
dev-node 'OpenVPN TAP-Windows2'(specify your OpenVPN network adapter name in Windows). - Check that the OpenVPNService service (
C:\Program Files\OpenVPN\bin\openvpnserv2.exe) is configured to start automatically.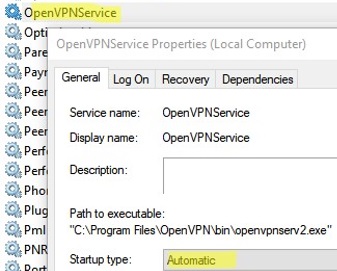
openvpn@client.service daemon.
This daemon automatically establishes VPN connections for all .conf configuration files in the /etc/openvpn directory (just rename your *.ovpn files to *.conf). And enable the service:
$ sudo systemctl enable openvpn@client.service
$ sudo systemctl start openvpn@client.service
–silent_connection 1 should help with connecting with the saved username/password