
By default, a running app in Windows can run on any of the available CPU cores. The operating system manages and distributes processes between cores. However, you can manually bind certain processes (applications) to processor cores in Windows using the Processor Affinity feature. Let’s see how to bind a program (process) to specific CPU cores in Windows.
Most often, manually binding a process to CPU cores is needed when:
- You want to restrict the use of CPU resources for a specific application;
- Some legacy applications may not work correctly in a multi-core architecture;
- You want to improve the performance of a resource-intensive app by dedicating separate CPU cores to the program. This ensures that cores are available for your process and reduces CPU manager delays related with selecting and switching between processes.
Set CPU Affinity Using Task Manager in Windows
You can manually bind a process to specific cores using the Task Manager:
- Run
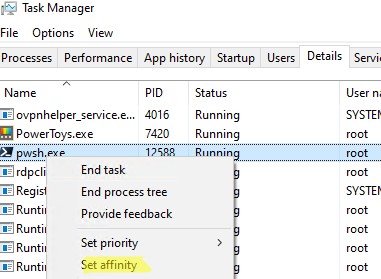
Taskmgr.exeand go to the Details tab; - Find the process you need, right-click on it, and select Set Affinity;
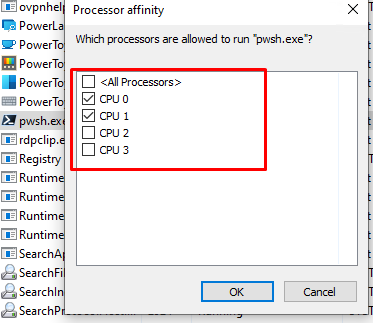
- A list of processor cores will appear in the window that opens. By default, a process can run on any of the CPU cores;
- You can leave enabled only those cores on which your process should run.
You can also assign CPU cores to any process using the Process Explorer utility. Click on any process and select Set Affinity.

How to Change the CPU Affinity for a Process Using PowerShell?
You can manage the mapping of a process to CPU cores using PowerShell. For example, to display the current processor affinity for the pwsh.exe process, run the following PowerShell command:
Get-Process pwsh | fl ProcessorAffinityProcessorAffinity : 63
What does the number 63 mean? The ProcessorAffinity value is a bitmask, where each bit corresponds to the processor core number.
You can get the number of CPU cores on the computer from the environment variable:
$env:NUMBER_OF_PROCESSORS
In our case, 6 cores are available on the computer (if the processor supports HyperThreading, then each processor core will be considered two logical cores).
The following table will help you calculate the ProcessorAffinity value using a bitmask:
| CPU | Decimal | (2*decimal-1) | Hex |
| CPU0 | 1 (20) | 1 | 1 |
| CPU1 | 2 (21) | 3 | 2 |
| CPU2 | 4 (22) | 7 | 4 |
| CPU3 | 8 (23) | 15 | 8 |
| CPU4 | 16 (24) | 31 | 10 |
| CPU5 | 32 (2)5 | 63 | 20 |
| CPU6 | 64 (2)6 | 127 | 40 |
| CPU7 | 128 (2)7 | 255 | 80 |
1+2+4+8+16+32=63
This means that all 6 cores will be available for the process.
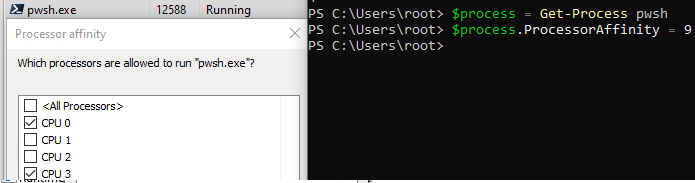
If you want to allow the process to use only 1 (CPU0) and 4 (CPU3) cores, the ProcessorAffinity value should be set to 9 (1+8).
To change the binding of a processor core to a program using PowerShell, run the command:
$process = Get-Process pwsh
$process.ProcessorAffinity = 9
If you specified an incorrect ProcessorAffinity value, this command will return an error:
SetValueInvocationException: Exception setting "ProcessorAffinity": "The parameter is incorrect."
Check the current process affinity settings in Task Manager:
If you need to start a process bound to certain cores immediately, use the following command:
Invoke-Command -ScriptBlock {cmd /c start /affinity 1 pwsh.exe}Create a Shortcut to Run the App on a Single CPU Core
Some legacy applications need to run on the first CPU core to work properly.
You can schedule the program to run on CPU0:
cmd.exe /C start /affinity 1 myapp.exeIn this example, we specified 1 in the affinity parameter. This is the ProcessorAffinity value, which indicates that the program will always be executed on the first core.
Run the command and check that the process is running on CPU0.

The CPU affinity value is specified in the previous command in hexadecimal format. You can calculate the value using the built-in “Calculator” app running in Programmer mode.
For example:
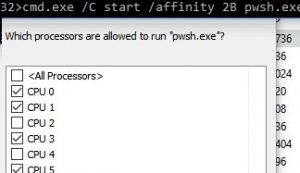
1 (CPU0) + 2 (CPU1) +8 (CPU3) + 20 (CPU5) = <strong>2B</strong>

The command to run the program on four CPU cores:
cmd.exe /C start /affinity 2b pwsh.exeCheck if the process is bound to the specified four cores.
You can immediately increase the priority of a process with the /High option:
cmd.exe /C start /high /affinity 1 myapp.exe/low | /normal | /high | /realtime | /abovenormal | /belownormalIf you need to constantly run the specific program on a single core, you can create a shortcut on the desktop with the following settings:
cmd.exe /c start "Acrobat DC" /affinity 1 "C:\Program Files\Adobe\Acrobat DC\Acrobat\Acrobat.exe"
If you want to change the shortcut icon, click the Change Icon button, and specify the full path to the executable file of the target app. Choose the icon you like from the resources.
![]()
Now, the user only needs to double-click on the shortcut to run the application on a single CPU core. This shortcut will allow you to permanently set processor affinity and priority for your application.
- IIS website running on Windows Server 2022/2019/2016 – select your application pool -> Advanced settings ->
Processor Affinity Enabled = True, Processor Affinity Mask = 1)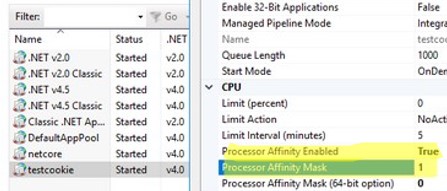
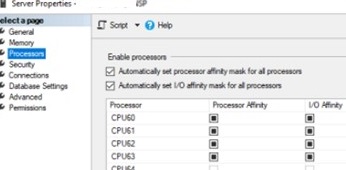
- Microsoft SQL Server -> open your MSSQL instance settings and go to the Processors tab. Check the CPU cores in the Processor Affinity column.
I never thought about CPU affinity until my gaming sessions with planet clicker started lagging during intense clicks. This guide just saved me from upgrading my hardware!