
I encounter strange virtual machines with Invalid (Unknown) status on VMware ESXi hosts on several occasions. In this article, we’ll take a look at how to troubleshoot and fix the invalid state of virtual machines from the VMware ESXi command line.
If you try to start a VM that has an Invalid status, an error will be displayed:
Could not power VM, no swap file, failed to power on VM.

VMControl error -11: No such virtual machine.
There may be other errors as well:
Could not power VM, no swap file, failed to power on VM.
A general system error occurred. The system returned on error. Communication with the virtual machine may have been interrupted.
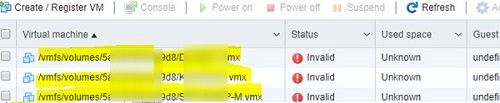
In some cases, the VM might start but display invalid status in vSphere Console. At the same time, all management options in the Actions menu of the virtual machine will be unavailable (greyed out). You cannot delete or unregister such a VM from the vSphere Client web interface, reboot the ESXi host, or unmount the VMFS/NFS datastore.
Most often, VMs on an ESXi host can go to invalid status after:
- Incorrect deletion of VM (not via vCenter);
- After HA or DRS errors;
- Emergency power off in the server room;
- vCenter was restarted during VM vMotion migration;
- Errors in VM vmx config file;
- VMFS datastore with virtual machine VMX file not available;
- Out of space in the vCenter database on the VMFS datastore.
Unregister the Invalid VM on VMware ESXi
You can resolve the invalid status of virtual machines from the VMware ESXi command line.
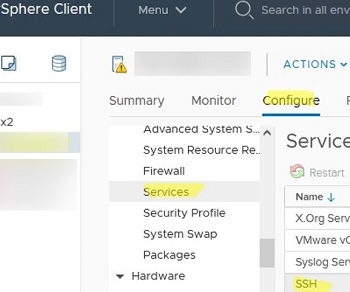
- Find the ESXi host on which your VM locates and enable SSH access to it. (Configure -> Services -> SSH -> Start);
- Connect to the ESXi host via SSH;
- To list all VMs with Invalid status, run the command:
# vim-cmd vmsvc/getallvms | grep invalidThis command lists the registered VMs. If the VM configuration file does not exist or contains errors, the command returns the lines:
Skipping invalid VM '14'

Skipping invalid VM '24'

Skipping invalid VM '53'
In this case, there are problems with VMs with VMIDs 14, 24, and 53.
- View information about the path to the VMX file for any VM (for example, check the VMID 24) using the command:
# grep 24 -A 2 /etc/vmware/hostd/vmInventory.xmlThe path to the VMX file is specified in the vmxCfgPath section, for example <vmxCfgPath>/vmfs/volumes/ e31052d4-be73-11ed-afa1-0242ac120002/TESTVM1/TESTVM1.vmx</vmxCfgPath>. In this example, e31052d4-be73-11ed-afa1-0242ac120002 is the UUID of the storage device on which the VM files are located. Check that this datastore path is accessible from your host and that the VMX file size on storage is not 0:
# ls –lh /vmfs/volumes/e31052d4-be73-11ed-afa1-0242ac120002/TESTVM1 - If the virtual machine VMX file is available, try reloading its configuration file by VMID using the command:
# vim-cmd vmsvc/reload 24 - Restart ESXi services if this doesn’t help:
# /etc/init.d/hostd restart # /etc/init.d/vpxa restart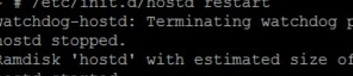 Refresh the vSphere Client interface. All VMs on the host will be in a Disconnected state for a few seconds and then return to normal.
In some cases, the only thing that helps is to unregister the VM on the ESXi host from the command line:
# vim-cmd vmsvc/unregister 24Now you can delete the invalid VM files from your datastore if you don’t need them. Or you can re-register its VMX file on the ESXi host with the command
# vim-cmd solo/registervm "/vmfs/volumes/e31052d4-be73-11ed-afa1-0242ac120002/TESTVM1/TESTVM1.vmx"Manually Remove the VM from the ESXi vmInventory.xml
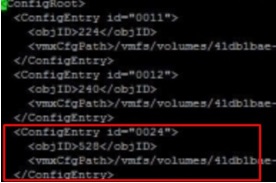
If you were unable to unregister a VM using the vmsvc/unregister command, try opening the /etc/vmware/hostd/vmInventory.xml file and manually deleting the configuration section of the invalid virtual machine.
# cd /etc/vmware/hostd
# cp -p vmInventory.xml vmInventory.xml_bak
# vi /etc/vmware/hostd/vmInventory.xmlRemove the <ConfigEntry id=’00xx’> <objID>24</objID> … </ConfigEntry> section from the XML file.
Restart the management agents with the command:
# service mgmt-vmware restartor
# services.sh restartYou can then use the following command to register the VM by its vmx file:
# vim-cmd solo/registervm your_vm_path.vmxIf the original VMX file of the VM is corrupted, create a new VM and manually add the VMDK disk files of the old VM.