
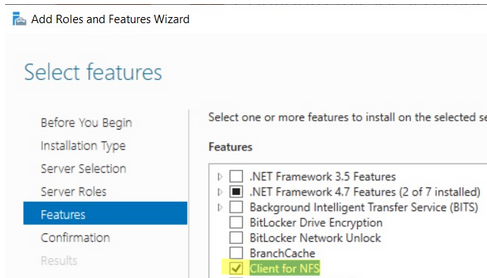
The Network File System (NFS) client is not installed by default on Windows Server 2022/2019/2016/2012R2 and Windows 11/10 desktop versions. To install it, open the Server Manager and select Add Roles and Features -> Client for NFS.
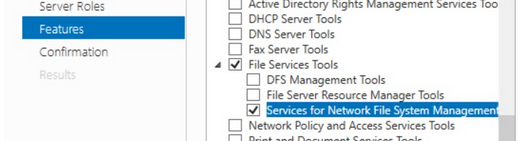
If you want to install graphical NFS management consoles (nfsmgmt.msc), select Services for Network File System Management Tools under Remote Server Administration Tools -> Role Administration Tools -> File Services Tools.
Install-WindowsFeature NFS-Client, RSAT-NFS-AdminIf you are running Windows 10 or 11, run the following to install the NFS client:
Enable-WindowsOptionalFeature -FeatureName ServicesForNFS-ClientOnly, ClientForNFS-Infrastructure -Online -NoRestartThe Windows NFS client supports NFSv2 and NFSv3 protocol verions.
Now you can mount the NFS share using PowerShell:
New-PSdrive -PSProvider FileSystem -Name M -Root \\192.168.0.211\mnt\hyperv -PersistWith CMD:
mount -o anon nolock \\192.168.0.211\mnt\hyperv M:You can also mount an NFS directory from the File Explorer GUI.
In order to disconnect NFS share, run:
Umount M:Or:
Remove-PSdrive -Name MAn error may occur when mounting NFS shares:
The remote device or resource won’t accept the connection.
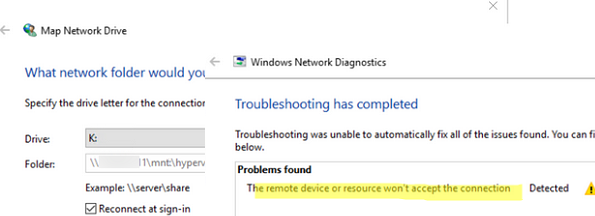
To resolve the problem, start the Services for Network File System (NFS) console and check the permissions that you have to connect to the remote share.
If you want to connect to an NFS share as an anonymous user, there are two registry items that you will need to add:
New-ItemProperty HKLM:\SOFTWARE\Microsoft\ClientForNFS\CurrentVersion\Default -Name AnonymousUID -Value 000001f4 -PropertyType "DWord"
New-ItemProperty HKLM:\SOFTWARE\Microsoft\ClientForNFS\CurrentVersion\Default -Name AnonymousGID -Value 00000064 -PropertyType "DWord"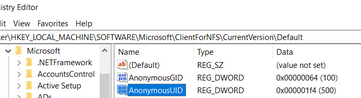
If you always want to connect using the root account, change the AnonymousUID and AnonymousGID settings to 0.
When using NFS connections in an Active Directory environment, there’s an important caveat:
If UNIX attributes are not added to AD and user name mapping is not configured, an anonymous connection is used to connect to the NFS server from Windows. You need to make changes to the AD schema (attributes uidNumber and gidNumber) in order to use alternative credentials to connect to NFS folder.
On WS 2012R2 domain controllers, you can add the UNIX Attributes tab to the AD user properties in ADUC:
Dism.exe /online /enable-feature /featurename:adminui /allHowever, this option is deprecated in Windows Server 2016, and it is suggested that user attributes be edited manually or using PowerShell:
Set-ADUser -identity user1 -add @{uidNumber="<user_unix_uid>";gidNumber="<user_unix_gid>"}An error may also occur when mounting an NFS directory:
You can't access this shared folder because your organization's security policies block unauthenticated guest access. These policies help protect your PC from unsafe or malicious devices on the network
In this case, you must create the AllowInsecureGuestAuth registry entry.
New-ItemProperty HKLM:\SYSTEM\CurrentControlSet\Services\LanmanWorkstation\Parameters -Name AllowInsecureGuestAuth -Value 00000001
New-ItemProperty HKLM:\ oftware\Policies\Microsoft\Windows\LanmanWorkstation -Name AllowInsecureGuestAuth -Value 00000001
Then restart the NFS service from the nfsmgmt.msc snap-in.
Windows PowerShell
Copyright (C) Microsoft Corporation. All rights reserved.
Install the latest PowerShell for new features and improvements! https://aka.ms/PSWindows PS C:\WINDOWS\system32> Enable-WindowsOptionalFeature -FeatureName ServicesForNFS-ClientOnly, ClientForNFS-Infrastructure -Online -NoRestart Enable-WindowsOptionalFeature : Feature name ServicesForNFS-ClientOnly is unknown.
At line:1 char:1
+ Enable-WindowsOptionalFeature -FeatureName ServicesForNFS-ClientOnly, …
+ ~~~~~~~~~~~~~~~~~~~~~~~~~~~~~~~~~~~~~~~~~~~~~~~~~~~~~~~~~~~~~~~~~~~~~
+ CategoryInfo : NotSpecified: (:) [Enable-WindowsOptionalFeature], COMException
+ FullyQualifiedErrorId : Microsoft.Dism.Commands.EnableWindowsOptionalFeatureCommand
PS C:\WINDOWS\system32>
Check your version of Windows. This command works on Windows 11 and 10 with build number 21H1+.
C:>mount -o anon nolock -o mtype=hard \\192.168.1.141\mnt\storage\nfs\storage N:
N: is now successfully connected to \\192.168.1.141\mnt\storage\nfs\storage
Local Remote Properties
——————————————————————————-
N: \\192.168.1.141\mnt\storage\nfs\storag UID=-2, GID=-2
rsize=262144, wsize=262144
mount=hard, timeout=0.8
retry=1, locking=no
fileaccess=755, lang=ANSI
casesensitive=no
sec=sys
I cannot see to get the UID or GID to be zero!
Registry is correct…
Windows Registry Editor Version 5.00
[HKEY_LOCAL_MACHINE\SOFTWARE\Microsoft\ClientForNFS\CurrentVersion\Default]
“AnonymousUID”=dword:00000000
“AnonymousGID”=dword:00000000
Any idea what is going wrong?
“The Windows NFS client supports NFSv2 and NFSv3 protocol verions” really???
What is with NFS Version 4 (RFC 7530), hey microsoft, it is more than 10 years old… no time for implementation, yet?
So everyone says -o, yet when I try that, I get New-PSDrive: Parameter cannot be processed because the parameter name ‘o’ is ambiguous. Possible matches include: -OutVariable -OutBuffer.
I do not have a clue what this means.
In PowerShell:
PS C:\Users\ray> mount -o anon nolock \\cobalt\brb M:
New-PSDrive : Parameter cannot be processed because the parameter name ‘o’ is ambiguous. Possible matches include:
-OutVariable -OutBuffer.
At line:1 char:7
+ mount -o anon nolock \\cobalt\brb M:
+ ~~
+ CategoryInfo : InvalidArgument: (:) [New-PSDrive], ParameterBindingException
+ FullyQualifiedErrorId : AmbiguousParameter,Microsoft.PowerShell.Commands.NewPSDriveCommand
In Command Prompt:
C:\Users\ray>mount -o anon nolock \\cobalt\brb M:
M: is now successfully connected to \\cobalt\brb
The command completed successfully.